Building a dog house isn’t very complicated if you choose a simple plan for the dog house, that don’t require many materials or a lot of assembling. If you choose a simple dog house, which is the most common style of dog houses then the process is quite simple and even enjoyable. And, since each pet needs their own little escape place, which is only theirs, here is a step by step guide on building a dog house.
First Step: Get prepared
Before starting your building process of the dog house, you need to prepare yourself, get the plans ready and prepare all of the necessary materials. You have to choose a dog house and a plan for a dog house that is proportionate to the size of your dog, and to the breed’s special features. If you have a small puppy, but you know that the breed can get quite large, don’t rush with building the dog house and wait until your dog has reached the size of a grown pet.
Second Step: Get ready the materials
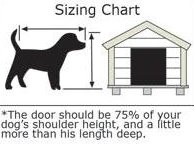
So the second step would be getting ready all of the necessary materials and tools for the construction work. The diagrams and plans for the dog houses will provide detailed measurements and explanation of all of the necessary materials and tools which are needed in order to create a dog house. You need to take the measurements and put them on the material, which you are going to use. You can use any material that you wish, but a popular choice is a plywood as it is durable enough to withstand even harsher weather conditions and it is also easy to work with. When laying out all of the pieces of the plywood, make sure that they are not touching so you can easily cut them afterward. And, remember to draw the entry door the right size, according to the size of your pet, as the door has to be large enough for your dog to comfortably get in and out of the dog house but also it cannot be too large.
Third Step: Start Cutting
When you have measured and drawn all of the pieces of the dog house on the plywood, you can start cutting them out. It is advised to use a sharp cross cut blade so that you can reduce chips and splintering of the plywood. During this part of the building process take your time and be gentle, as you not only want beautifully cut parts, that are straight and splinter free, but you also want to avoid any injuries. If you are not confident with using an electric saw, you can always ask for help. But before you start cutting, you need to decide the way you are going to cut your pieces out – wither directly on the drawn lines, or on the outside or on the inside of them, because once you choose the style, you should be consistent with it so that your parts will work together nicely.
When you have finished cutting the pieces, make sure you sand all of the edges with an orbital sander or any sanding block, in order to remove any rough edges, or splinters.
Fourth Step: Build the base of the dog house
When you have cut out all of the necessary pieces you can start to assemble your dog house. Start by building the base of the pet house first. Place the bottom panel on the base and make sure that all of the edges are in right spots. You have to pay a little more attention to the base as it will hold the whole dog house together. Use the appropriate screws to makes sure that the base panel is firm and will stay in place.
Fifth Step: Assembling the top parts
When you have made sure that the bottom panel is all set and in place, you can think about adding the rest of the parts, which go on the top of the bottom panel. When adding the side parts follow the instructions which are provided by the dog house plan you selected. Just remember to securely screw each piece in the right spot, and make sure that the parts aren’t moving around and will be durable, even if your dog accidentally knocks into one of the sides of the dog house.
When you have assembled all of the bottom and side parts you can add the roof panels. When adding the roof you have to pay a little more attention to the fact that it will protect your pup against any weather conditions, rain and snow. You can shingle the roof with a material used for real houses, which is water-proof, or treat the roof with some kind of weather-resistant wood finish. Just make sure that you attach all of the parts neatly, so they are not blown away by the first wind breeze.
Last Step: Finish the dog house
If you have added all of the parts together, with screws and made sure that the dog house will be holding together during wind breezes and thunder storms, you can then move to designing the look of your dog house the way you want it. If you choose to paint it, use low-VOC exterior paint which is animal-friendly. Apply wood finish and only after two to three days let your pet in the new house, to avoid the possibility of any lingering fumes.
Building a pet house can take up few days and it can require some extra effort, but it is definitely worth it, as your dog will be very thankful for the little nook of his own.


